The bin is empty, drinks are warming, and guests arrive soon. When an ice maker stalls, you need fixes you can trust. This guide shows the first checks that solve common issues, how to run a proper clean, what typical codes mean, and the moment a service call saves time and money for home ice maker machines in real kitchens.

3 Essential Checks Before You Do Anything Else
Before you dive into parts and panels, rule out the simple stuff. These checks solve a large share of complaints and take only a few minutes.
- Temperature and water basics: Room heat and intake water temperature control cycle time. Place the unit away from ovens, sunlit windows, and heat vents. Refill the reservoir with cool drinking water. If the machine sits in a garage or patio, let it acclimate indoors for a bit and try again.
- Power, sensors, and a soft reset: Confirm the outlet works by testing a lamp or phone charger. Seat the plug firmly. Look at the panel for ice-full or low-water lights. Empty the basket, top up the tank, and restart the unit. If your model includes a built-in cleaning program, run it once, as this often clears minor faults.
- Water quality and recent cleaning: Mineral scale and residue limit flow and can fool sensors. If it has been a week or longer since the last cleaning, plan one today. Keep a small bottle of ice maker cleaning solution on hand. A mild vinegar or lemon-water rinse helps when cleaner is not available. Ice machines used in food establishments face similar water quality challenges but typically require daily cleaning protocols due to health code requirements.
Tip: If you want a quick reference, print your manual's "care and maintenance" page and tape it inside a cabinet. You will use it more than you expect, especially when you wonder how to clean ice maker parts quickly.
Problem: My Ice Maker Isn't Making Ice at All
Start with water, temperature, and maintenance, which causes most stalls. Unplug the unit and dry the surrounding area before you begin. This sequence helps you quickly diagnose an ice cube maker not making ice.
Refill and restart: If the water looks cloudy, drain it. Refill with cool drinking water, restart the unit, and listen for circulation within a minute.
- Clear the full-bin detection: Remove the basket and any stray cubes around the evaporator or sensors. Reseat the basket, confirm the lid closes freely, and set the unit perfectly level.
- Run the built-in cleaning program: Start the cleaning cycle as described in your manual. Let it finish, drain the tank, then run a short fresh-water rinse cycle.
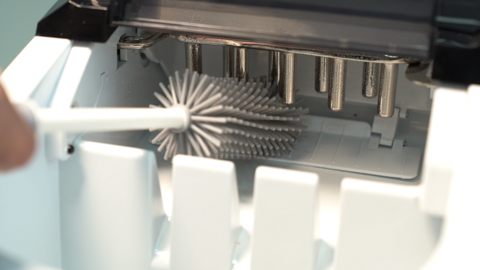
- Clean the separator and pump screen: Unplug the unit. If your manual allows, lift out the small filter or splitter that distributes water across the freezing surface. Rinse with warm water and a soft brush, then reinstall.
- Give it a cooler environment: Move the machine to a shaded counter with airflow on all sides, away from heat and direct sun. Try another cycle.
- Record and assess: If production stays at zero after these steps, capture a short video of startup, panel lights, and sounds. These speeds support an ice maker not working after resets and cleaning.
Result check: If steps 1 through 3 restore circulation and the next cycle yields fresh ice, you are set. If not, continue with steps 4 through 6.
Problem: My Ice Maker Is Making Loud Grinding or Squealing Noises
A healthy machine hums softly. Sharp squeals, scraping, or repetitive knocking usually point to debris, scale, or a fan rub. Unplug the unit and dry the area before you start.
Power off and inspect: Open the lid, let remaining ice soften for a few minutes, and wipe condensation. Spin the fan gently with a cotton swab to confirm free movement. Remove packaging bits, pet hair, and dust from vents.
- Rinse the pump intake: Lift out the reservoir intake mesh or small filter and rinse with warm water. Nugget or pellet styles can build scales where moving parts touch slushy ice, so a thorough rinse helps.
- Run the built-in cleaning program: Complete one cleaning cycle, drain, then run a short fresh-water rinse to carry away residue and air bubbles.
- Level the chassis: Place a small level on the top panel and adjust the feet until true. A slight tilt can create contact and noise during operation.
- Test with fresh water: Add cool water and monitor a full cycle to see if noise fades as the system stabilizes.
- Capture a sound clip: If noise persists, record 10 to 20 seconds of audio with the panel visible for support to pinpoint wear items.
Result check: After cleaning and leveling, the noise should fade within one cycle. If harsh sounds continue, prepare the clip and contact support.
Problem: My Ice Maker Is Leaking Water
Most leaks come from a loose drain, an unlevel chassis, or disturbed tubing. Keep the unit unplugged and wipe up all moisture before each test.
Seal the drain and level the unit: Tighten the drain plug and confirm the basket sits correctly in its rails. Level the machine. Verify the water never exceeds the MAX fill line.
- Check the reservoir tubing: Some models use a silicone hose on a barb fitting. Moves and vibration can loosen it. Reseat tubing per manual and dry any pooled water.
- Inspect the lid and gasket: Check that the lid closes cleanly and the gasket is clean and seated. Wipe and refit if needed.
- Retest with a small fill: Add a small amount of water first. It is easier to trace the source from a light test than from a full tank.
- Under-counter checks: For built-in units, confirm a steady downward drain slope and no kinks or low spots. Ensure ventilation around the condenser to reduce heavy condensation on panels.
- Document the leak path: If water reappears, film the first minute after startup and mark the origin point. This helps diagnose an ice maker not working through a full cycle.
Result check: If a small test fill stays dry after tightening and leveling, resume normal use. If pooling returns, pause use and share your video with support.
Problem: My Ice Maker Is Showing an Error Code such as E2
Code meanings differ by model, so match the exact code to your manual. You can still try a few safe actions. Unplug the unit and dry the area before any step.
Clean and restart: Run the built-in cleaning program, drain, refill with cool water, and restart. Watch for the moment the code returns.
- Note the timing and conditions: Record room temperature, water temperature at the tap, and time to code. An immediate code hints at a sensor or control issue. A delayed code can involve refrigeration performance.
- Clear environmental variables: Move the unit to a cooler, well-ventilated spot and retest to rule out heat and airflow issues.
- Check for recurring E2: If E2 appears again after a proper clean and restart, stop DIY. Repeated codes or zero production after resets signal a fault that needs service.
- Prepare evidence for support: Record a short clip from power-on to the code, with panel and sound. Include your notes on temperatures and timing. This gives the team everything they need without back-and-forth.
Result check: If the code disappears and ice production resumes after a clean, cool restart, you are done. If it returns, hand off to service for a safe fix.
How to Prevent Future Ice Maker Problems
Small, regular habits keep an ice maker steady and quiet. A few minutes each week prevents clogs, keeps sensors accurate, and preserves a clean taste. Use the routine below as a simple loop: quick checks during the week, a short clean on the weekend, and a deeper refresh when performance slows.
Clean Weekly (10–15 minutes)
Start by unplugging the unit, emptying the basket, and draining the tank. Then run the built-in cleaning program, drain again, and refill. After that, make two short ice cycles and discard those cubes, and finish by wiping the lid gasket and the level-sensor area with a damp cloth. This keeps the water path clear and flavors neutral.
Refresh the Water Every Three Days
Empty the standing water and refill it with cool drinking water. If your tap is hard, switch to filtered water so mineral buildup slows and cubes stay consistent.
Maintain Level and Airflow Each Day
Keep the unit level, and leave several inches of open space on both sides and at the back so the condenser can release heat. Also, dust the rear grille during your regular kitchen wipe-down. Avoid running the machine inside closed cabinets, since trapped heat lengthens cycles. Proper airflow is essential to how an ice maker works, as the condenser must dissipate heat efficiently for optimal ice production.
After Gatherings or Heavy Use
When you need to hold ice for later, move fresh cubes to your kitchen freezer. Then rinse and dry the basket so flavors do not carry into the next day's batches.
Descale Monthly When Needed
If you notice a white film or longer cycles, mix an ice-maker-safe cleaner or a mild vinegar solution with water and run a descale. Follow with two plain water rinse cycles to clear any residue.
Prepare for Seasonal Breaks
For longer pauses, drain completely, run one clear-water rinse, and towel-dry visible moisture. Leave the lid slightly open for a few hours, then store the unit in a cool, dry place. Keeping a printed quick reference on cleaning in a nearby cabinet makes the next startup easier.
When to Call a Professional
DIY has clear limits. Protect your time, warranty, and safety by asking for help when any of these apply:
- The same code returns immediately after a full clean and restart
- Ice production remains at zero after multiple cycles, and the room is cool
- Leaks continue after you reseat the plug, level the chassis, and check the tubing
- Mechanical noise persists after cleaning and fan inspection
- You suspect sealed-system faults or an electrical smell
Keep purchase details, serial number, and a short video ready. Support teams troubleshoot faster when they can see the panel, hear the sounds, and review the steps you already tried. Professional help keeps home ice maker machines productive without risky trial and error.
If you are unsure, stop using the unit and send support a short video of the startup and panel; that quick review often saves time.
Final Thoughts on Your DIY Repair
Most ice interruptions come from warm water, a hot room, scale in the reservoir, or sensors that need a reset. A small routine solves those triggers before guests arrive. Keep the machine level, feed it cool water, and run the cleaning program each week. When a code repeats or parts sound stressed, move straight to service. That balance keeps home ice maker machines reliable for everyday drinks and weekend hosting. Choosing from the best home ice makers available ensures fewer breakdowns and more consistent performance over time.
FAQs about Ice Maker Repair
Q1: How do I remove plastic or factory taste from new machines?
Wash the basket and interior with a lemon-water mix, rinse, then run two full ice cycles and discard those cubes. Finish with a plain-water cycle. Taste improves quickly once the residue leaves the water path.
Q2: Can I use distilled water every day?
Distilled water helps with scale and clarity. Some sensors read pure water differently, though. If your manual mentions a minimum mineral level, blend distilled and filtered tap water for consistent detection.
Q3: Why do cubes look cloudy even after cleaning?
Cloudiness often comes from trapped air and minerals. A slower cycle with cooler room air and a fresh refill usually clears it. If the tray is overfilled, correct the water level and try again.
Q4: What causes a burnt smell during a cycle?
Stop immediately and unplug. Heat and odor can come from a blocked condenser, a fan that no longer turns, or electrical issues. Clean the rear grille, spin the fan gently by hand, then call for service if odor returns.
Q5: How do I prep for a party without babysitting the machine?
Start producing early, store batches in sealed bags in your kitchen freezer, and cycle the machine through one quick clean after the event. The next day's ice tastes better, and the basket stays fresh.
Q6: What is different when I try to fix fridge ice maker problems?
A refrigerator's ice maker ties into a valve, door switches, and a separate freezer environment. Flow restrictions and frozen fill tubes are common there. Use the appliance manual and consider a pro for valve or chute work when you plan to fix fridge ice maker issues.


Leave a comment
All comments are moderated before being published.
This site is protected by hCaptcha and the hCaptcha Privacy Policy and Terms of Service apply.